Overview
Although Linkerd has heard of its name for a long time, and probably understand some of its architecture, but really have not tried it, mainly because its previous version is really not easy to use, but it is said that the second version has changed a lot, so recently followed the video of others to play a little, by the way, a water.
Environment preparation
Install Kind
The environment used is Ubuntu.
[root@liqiang.io]# curl -Lo . /kind https://kind.sigs.k8s.io/dl/v0.11.1/kind-linux-amd64[root@liqiang.io]# chmod +x . /kind[root@liqiang.io]# mv . /kind /usr/local/bin/kind
Creating a cluster
[root@liqiang.io]# kind create cluster[root@liqiang.io]# kind create cluster --name linkerd --image kindest/node:v1.19.1[root@liqiang.io]# kind get clusterskindlinkerd
Add local DNS records
[root@liqiang.io]# sudo echo "127.0.0.1 servicemesh.demo" >> /etc/hosts
Deploying a test application
[root@liqiang.io]# git clone https://github.com/marcel-dempers/docker-development-youtube-series.git[root@liqiang.io]# echo "create nginx ingress"[root@liqiang.io]# kubectl create ns ingress-nginx[root@liqiang.io]# kubectl apply -f kubernetes/servicemesh/applications/ingress-nginx/[root@liqiang.io]# echo "create applications"[root@liqiang.io]# kubectl apply -f kubernetes/servicemesh/applications/playlists-api/[root@liqiang.io]# kubectl apply -f kubernetes/servicemesh/applications/playlists-db/[root@liqiang.io]# kubectl apply -f kubernetes/servicemesh/applications/videos-web/[root@liqiang.io]# kubectl apply -f kubernetes/servicemesh/applications/videos-api/[root@liqiang.io]# kubectl apply -f kubernetes/servicemesh/applications/videos-db/
To access the test application, open a local browser and type: http://servicemesh.demo/home/ and you should see this page.
| Figure 0: Test app page |
|---|
|
Deploying Linkerd
Here I followed someone else’s video action and chose a Docker container to operate within.
[root@liqiang.io]# docker run -it --rm -v ${HOME}:/root/ -v ${PWD}:/work -w /work --net host alpine:3.12 sh/work # echo "Now inside the container"/work # apk add --no-cache curl nano/work # curl -LO https://storage.googleapis.com/kubernetes-release/release/`curl -s https://storage.googleapis.com/kubernetes-release/ release/stable.txt `/bin/linux/amd64/kubectl/work # chmod +x . /kubectl/work # mv . /kubectl /usr/local/bin/kubectl/work # export KUBE_EDITOR="nano"/work # kubectl get nodesNAME STATUS ROLES AGE VERSIONlinkerd-control-plane Ready master 127m v1.19.1
Install Linkerd Cli.
/work # curl -L -o linkerd https://github.com/linkerd/linkerd2/releases/download/edge-20.10.1/linkerd2-cli-edge-20.10.1-linux-amd64/work # chmod +x linkerd && mv . /linkerd /usr/local/bin//work # linkerd check --pre
You should see a piece of ✅ right at the end, with a little Warning, and the result here is ❎, because I executed it after installation, so please ignore it:
| Figure 1: Precheck |
|---|

|
Installing Linkerd
[root@liqiang.io]# linkerd install > . /kubernetes/servicemesh/linkerd/manifest/linkerd-edge-20.10.1.yaml[root@liqiang.io]# kubectl apply -f . /kubernetes/servicemesh/linkerd/manifest/linkerd-edge-20.10.1.yaml[root@liqiang.io]# linkerd check
Check again, it should be working at this point.
| Figure 2: PostCheck |
|---|

|
View Dashboard
[root@liqiang.io]# kubectl -n linkerd port-forward svc/linkerd-web 8084
If you’re on a remote machine, you may need to proxy a bit (if you can’t be bothered) because Linkerd has set up Host filtering:
[root@liqiang.io]# ssh -L 8084:127.0.0.1:8084 <host-ip>
Then visit http://127.0.0.1:8084/namespaces and you will see this screen.
| Figure 3: Linkerd Dashboard |
|---|

|
The following is a formal injection of Linkerd, which is the same as Istio, and is achieved by injecting Sidecar, so there is no difference.
Linkerd uses
to inject Sidecar
In this step, we start injecting Linkerd’s sidecar into all the services, and then we’ll see what’s displayed in the Dashboard, if we don’t inject Sidecar, nothing will be displayed:
[root@liqiang.io]# kubectl get deploy playlists-api -o yaml | linkerd inject - | kubectl apply -f -[root@liqiang.io]# kubectl get deploy playlists-db -o yaml | linkerd inject - | kubectl apply -f -[root@liqiang.io]# kubectl get deploy videos-api -o yaml | linkerd inject - | kubectl apply -f -[root@liqiang.io]# kubectl get deploy videos-db -o yaml | linkerd inject - | kubectl apply -f -[root@liqiang.io]# kubectl get deploy videos-web -o yaml | linkerd inject - | kubectl apply -f -[root@liqiang.io]# kubectl -n ingress-nginx get deploy nginx-ingress-controller -o yaml | linkerd inject - | kubectl apply -f -
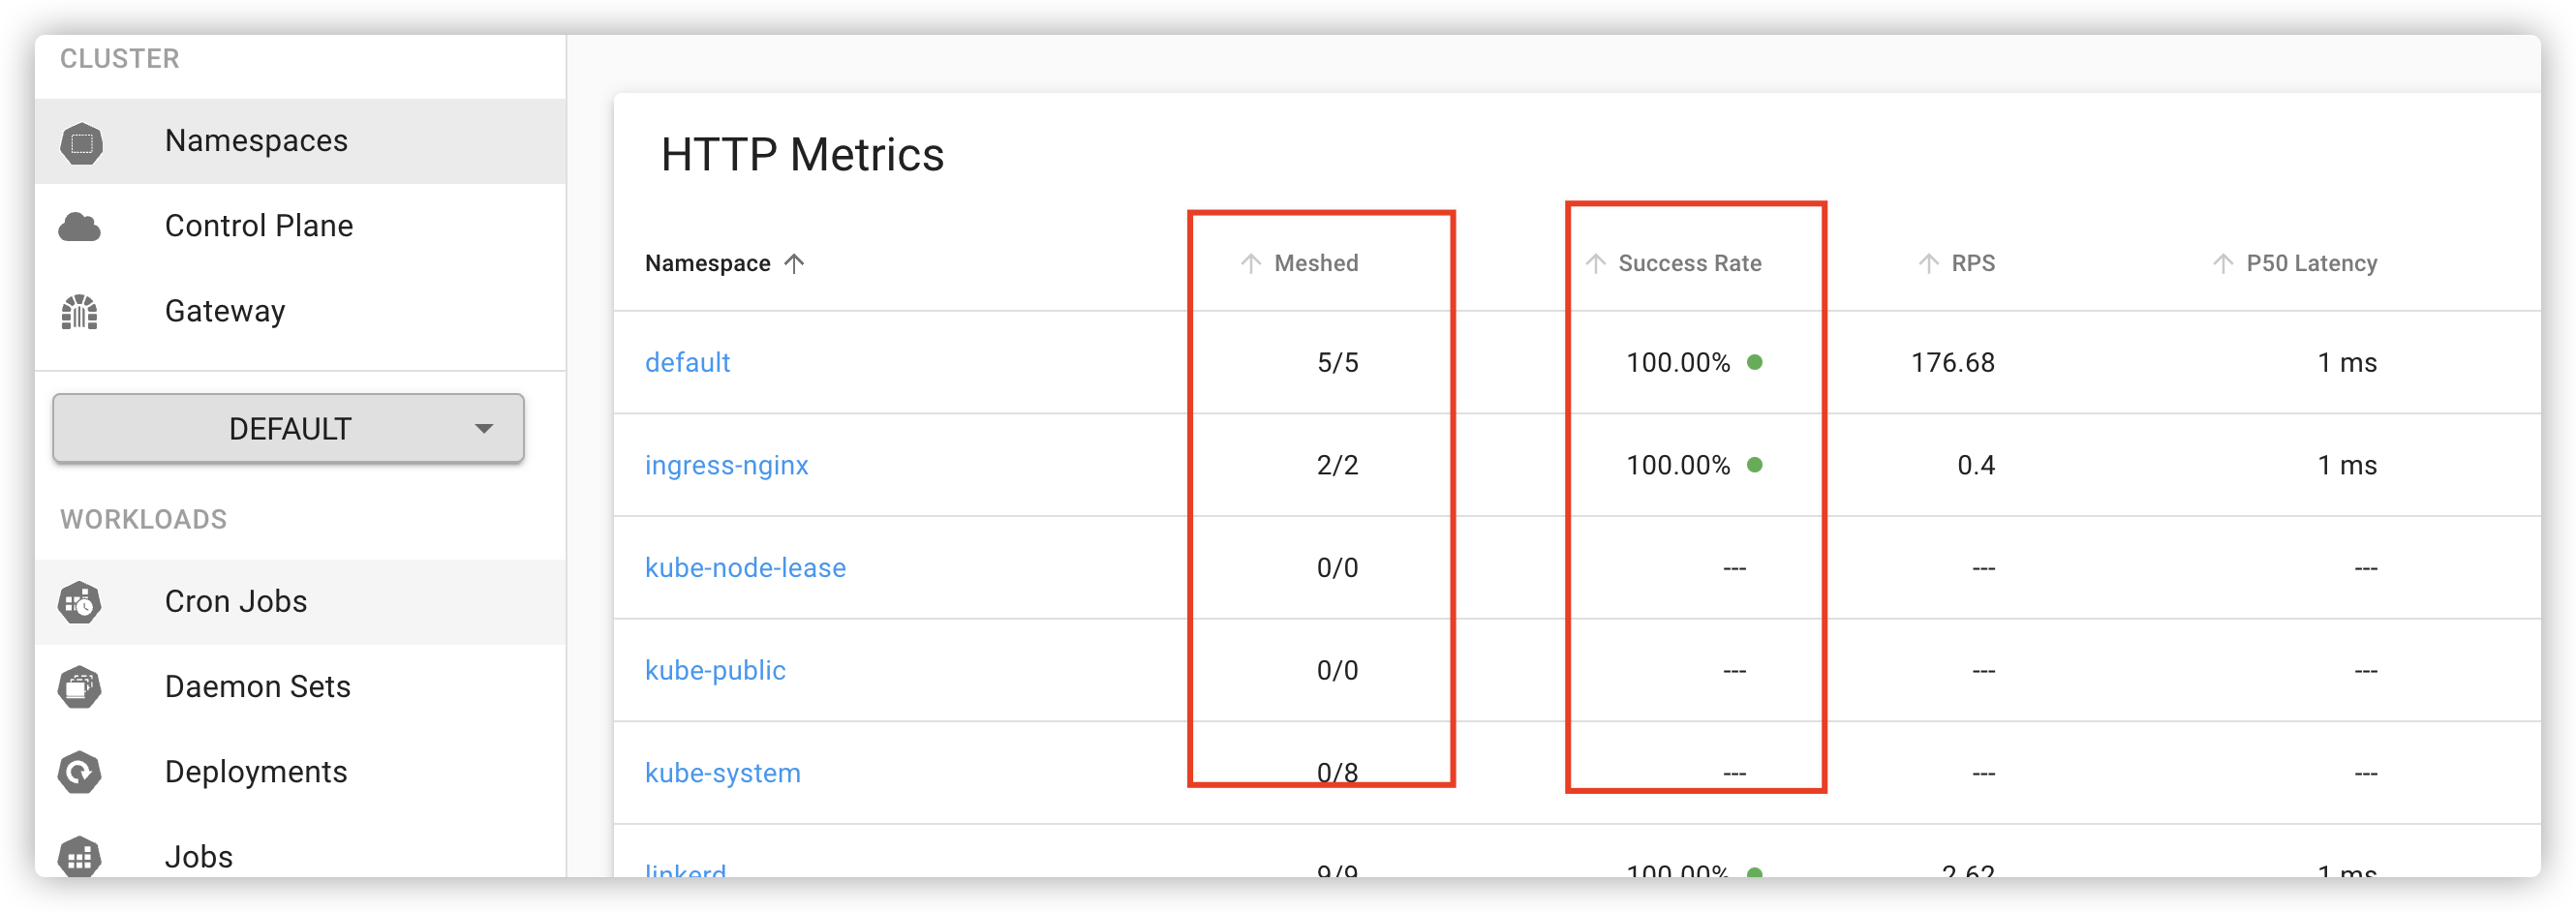
Then open Dashboard:
| Figure 4:Dashboard Data |
|---|
|
You can see that the Meshed Pods have some success rate and latency data, which means Sidecar is working. The Dashboard doesn’t really have much to offer, but after clicking on a Metric you can see a graph of the call chain, and not much else.
| Figure 5: Call chain | |
|---|---|

| ! |
Monitoring traffic
This Dashboard is used to monitor traffic. For example, after you find an API exception, you can use this monitoring dashboard to see the status of the API to locate and resolve the exception:
| Figure 6: Traffic Monitoring |
|---|

|
Summary
That’s about it for this article, but it’s mostly a reference to this video (Introduction to Linkerd for beginners | a Service Mesh). I’ve learned how to use Linkerd, but I haven’t had a chance to experience some of the features, so I’ll continue.